

Menu:
Ox Tail Soup Meal
Wine: Malbec $10-20
Soup: Ox Tail Soup
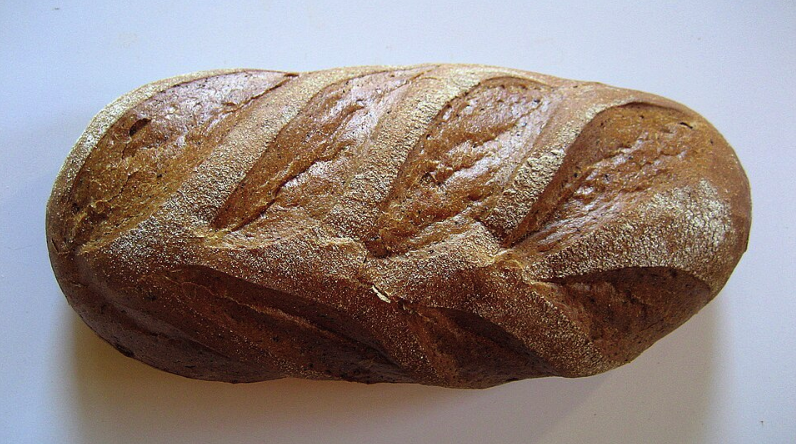
Bread: Black Bread
Butter: White Pepper
Vegetable: Brussel Sprout Kraut
Air Fryer + Instant Pot Oxtail Soup
Rich, deep, and hands-off once it’s cooking. The air fryer builds the flavor; the Instant Pot extracts it.
Ingredients
- 2–3 lbs oxtail, cut into segments
- Salt and black pepper
- 1 onion, chopped
- 2 carrots, chopped
- 2 celery stalks, chopped
- 4 cloves garlic, smashed
- 2 tbsp tomato paste
- 1 tbsp soy sauce (optional, adds depth)
- 1 tsp smoked paprika
- 1 tsp dried thyme
- 1 bay leaf
- 6 cups beef broth (or water + bouillon)
- 1 tbsp apple cider vinegar (or red wine vinegar)
Optional add-ins:
- Potatoes or turnips (chunked)
- Barley or rice
- Fresh parsley for finish

Step 1 — Air Fryer (build flavor)
- Pat oxtail dry. Salt and pepper well.
- Preheat air fryer to 400°F.
- Arrange oxtail in a single layer.
- Cook 15–20 minutes, turning once, until well browned.
You’re not cooking it through—just developing color and fat.
Step 2 — Instant Pot (extract everything)
- Set Instant Pot to Sauté.
- Add a little oil if needed.
- Add onion, carrot, celery. Cook 5–7 minutes.
- Add garlic and tomato paste. Cook 1–2 minutes.
- Deglaze with a splash of broth (scrape the bottom well).
Step 3 — Pressure cook
- Add oxtail to the pot.
- Add broth, soy sauce, paprika, thyme, bay leaf, vinegar.
- Lock lid.
Cook on High Pressure – 45 minutes
Natural release (15–20 min)
Step 4 — Finish
- Skim fat if needed (or leave it—flavor).
- Taste and adjust salt.
- Add chopped parsley if you want brightness.
Optional:
- Add potatoes and cook on sauté until tender
- Add cooked barley for a thicker soup
Black Rye Bread
A deep, slightly sour rye loaf with a dark crust and tight crumb. Built for soups, stews, and long storage.
Ingredients
- 2 cups rye flour
- 1 cup bread flour (or all-purpose)
- 1 ¼ cups warm water
- 2 tbsp molasses (or dark syrup)
- 1 tbsp cocoa powder (for color, not sweetness)
- 1 ½ tsp salt
- 1 tbsp caraway seeds (optional)
- 1 packet (2 ¼ tsp) active dry yeast
Optional:
- 1 tbsp apple cider vinegar (adds slight tang)
- Cornmeal for dusting
Step 1 — Activate yeast
- In a bowl, mix warm water + molasses.
- Sprinkle yeast over top.
- Let sit 5–10 minutes until foamy.
Step 2 — Mix dough
- Add rye flour, bread flour, cocoa powder, salt, and caraway.
- Mix until a sticky dough forms.
Rye dough will be stickier and denser than wheat dough—this is normal.
Step 3 — Knead (lightly)
- Knead 5–8 minutes (or use a mixer with dough hook).
- Add small amounts of flour if needed, but keep it slightly tacky.
Step 4 — First rise
- Place in oiled bowl.
- Cover.
- Let rise 1–1.5 hours (until roughly doubled).
Step 5 — Shape
- Shape into a round or oval loaf.
- Place on parchment or in a lightly floured bowl.
Optional: dust with rye flour or cornmeal.
Step 6 — Second rise
Let rise 30–45 minutes.
Step 7 — Bake
- Preheat oven to 425°F.
- Score the top with a sharp knife.
- Bake 30–35 minutes until dark and firm.
Optional:
- Place a pan of water in the oven for steam (better crust)
Step 8 — Cool
Let cool at least 1 hour before slicing.
This bread firms up as it cools.
Charred Brussels Sprout Kraut (Smoked Citrus Ferment)
A sharper, greener kraut built from Brussels sprouts, lightly charred for depth and finished with citrus and spice. Bright, bitter, and complex—cuts through rich meats and soups.
Ingredients
- 2 lbs Brussels sprouts
- 1 tbsp salt (by weight ~2% is ideal)
- 1 tsp black peppercorns, cracked
- 1 tsp mustard seeds
- 1 tsp coriander seeds
- Zest of 1 lemon
- 1 clove garlic, thinly sliced
Optional:
- 1 small dried chili (or flakes)
- 1 tsp caraway seeds
Step 1 — Prep the sprouts
- Trim ends and remove tough outer leaves.
- Slice thin (knife, mandoline, or food processor).
Step 2 — Quick char (build depth)
- Heat a pan or air fryer to high (around 400°F).
- Add sprouts dry (no oil).
- Cook 5–8 minutes, stirring once, until edges get light browning.
Do not fully cook—just a light char for flavor.
Let cool.
Step 3 — Salt and massage
- Place sprouts in a bowl.
- Add salt.
- Massage firmly 5–10 minutes until liquid begins to release.
You want visible brine forming.
Step 4 — Add aromatics
Mix in:
- peppercorns
- mustard seeds
- coriander
- garlic
- lemon zest
- chili (if using)
Step 5 — Pack
- Pack tightly into a clean jar.
- Press down until liquid rises above the sprouts.
- Leave about 1 inch of headspace.
If needed, add a small amount of 2% salt water to cover.
Step 6 — Ferment
- Keep at room temp (65–75°F).
- Loosely covered or with airlock.
Timeline:
- Day 2–3: active bubbling
- Day 5–7: sharp and bright
- Day 10–14: deeper, more rounded
Taste and decide when it’s done.
Step 7 — Store
Once it tastes right:
- Seal
- Refrigerate
Keeps for months.
White Pepper Butter (KitchenAid, from Heavy Cream)
A smooth, lightly spiced butter with a gentle, earthy heat from white pepper. Good on bread, potatoes, vegetables, fish, or simple roasted meat.
Ingredients
- 1 pint heavy whipping cream, cold
- 1 1/2 tsp white pepper, finely ground
- 1/2 tsp salt, or to taste
- Ice water, for rinsing
Step 1 — Churn the cream
- Pour the cold heavy cream into the bowl of your KitchenAid mixer.
- Attach the whisk.
- Start on low, then raise to medium-high.
The cream will go through stages:
- first loose and creamy
- then whipped cream
- then grainy and thick
- then it will suddenly break
When it breaks, you will see yellow butter solids separate from the liquid buttermilk.
Step 2 — Separate butter and buttermilk
- Stop the mixer once the butter has clearly clumped together.
- Strain off the buttermilk into a jar or bowl.
Save the buttermilk for baking, pancakes, or biscuits if you want.
Step 3 — Wash the butter
- Put the butter back in the bowl or into a separate bowl.
- Pour in very cold or ice water.
- Press and squeeze the butter with a spoon, spatula, or clean hands to push out more buttermilk.
- Pour off the cloudy water.
- Repeat until the water stays mostly clear.
This matters because leftover buttermilk makes the butter spoil faster.
Step 4 — Season it
- Add the white pepper and salt to the washed butter.
- Switch to the paddle attachment, or work it in by hand.
- Mix on low just until evenly combined.
Taste and adjust. White pepper has a slow, warming bite, so add more carefully.
Step 5 — Shape and store
Log
- Spoon the butter onto parchment or wax paper
- Roll into a tight cylinder
- Twist the ends closed
Container
- Pack into a small jar, crock, or ramekin
Refrigerate until firm.
Storage
- Fridge: about 1 week, often a bit longer if washed well
- Freezer: several months
Tips
- Do not walk away while mixing. Once whipped cream turns, it can break fast.
- Freshly ground white pepper gives the best flavor.
- For a smoother, more elegant butter, sift the pepper before adding it.
Tools Suggestions:
You don’t need these items, but they are really handy.
They all have specific uses that do that thing they do best.
If you want to cook meat wet and fast use a pressurecooker,
if you want food hot and crispy use an air fryer.
You can use them together to make some great meals.

- 7 Cooking Functions: Pressure cook, slow cook, sauté, steam, cook rice, make yogurt, or keep your meals warm, all in one compact device.
- Mini and Mighty: Easy to store, offering the same cooking surface as an 8-inch pan
- Fun Sized Capacity: The 4-quart capacity is perfect for up to 4 servings, ideal for students, singles, and small families
- Cooking Status at a Glance: Progress indicator lets you monitor your cooking status with ease
- Intentionally Convenient: Anti-spin design ensures the pot stays steady for effortless stirring and sautéing
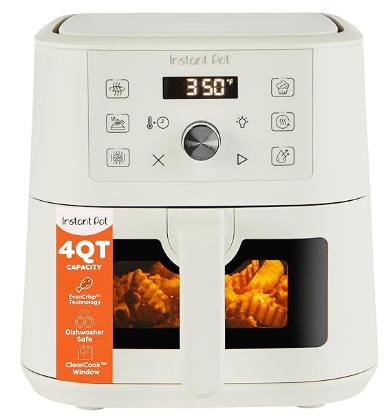
- 6 Cooking Functions: Air fry, bake, roast, broil, dehydrate or reheat with little to no preheating time, all in one easy appliance.
- Mini and Mighty: Small size saves counter space without sacrificing capacity. Its 4-quart capacity is perfect for up to 4 servings, ideal for students, singles, and small families
- Guiltless Crisp: EvenCrisp Technology delivers that deep-fried crunch with a fraction of the oil, keeping every bite crispy on the outside and tender on the inside
- Sneak a Peak: A large ClearCook window and bright internal light let you track your food’s progress—no need to open the door and lose heat
- Quick Cleanup: No more fighting about who has to do the dishes. The dishwasher-safe, non-stick air fryer basket make washing up effortless
A good kitchen torch for under $35
A second seal for your 4Qt. cooker so you can do sweet and savory dishes for under $15
Find a refurbished Kitchenaid 5Qt. Mixer for under $375

